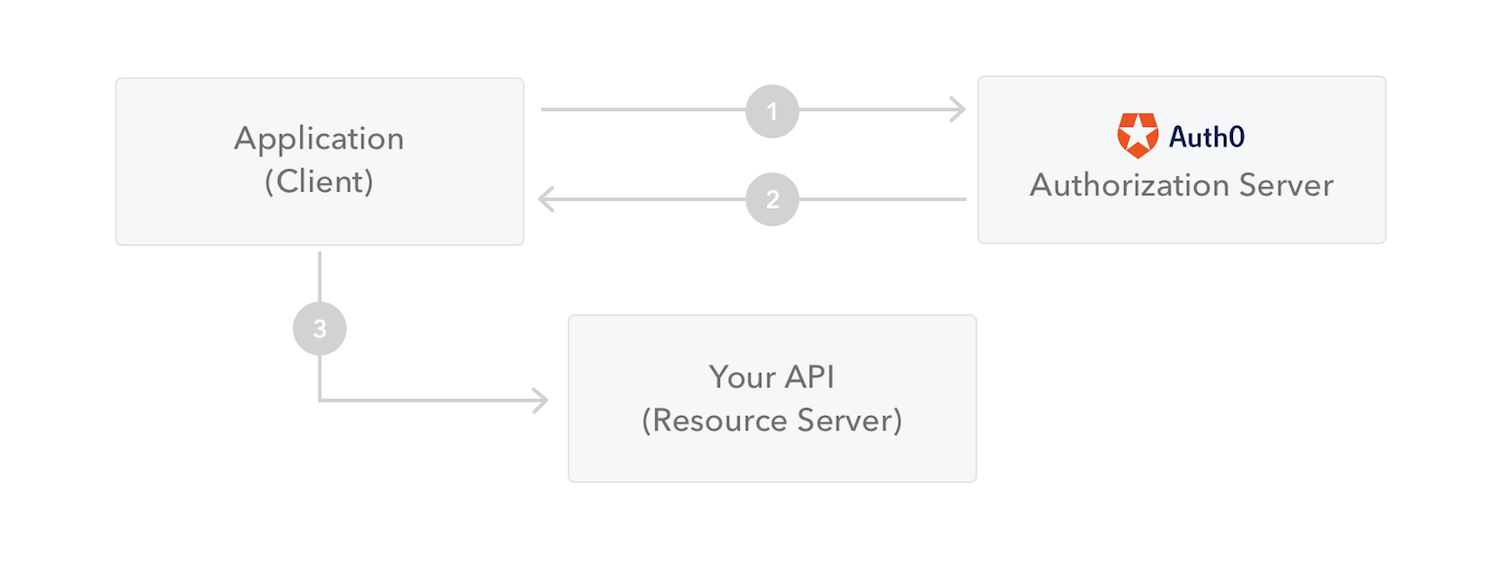
User authentication is one of the most important part of an application. Node js have several kinds of ways to handle authentication. In this article, we are mainly focused on JWT authentication. it will help you that how JWT authentication work.
What is JWT?
A stateless method of securely transmitting information between parties as a Javascript Object Notation (JSON) is used to authenticate and authorize users in web applications and APIs or more Source
JSON Web Token structure?
JSON Web Tokens consist of three parts separated by dots (.), which are:
Header
Payload
Signature
Example
xxxxx.yyyyy.zzzzz
Header
The header typically consists of two parts: the token type(JWT) and signing algorithm (HMAC SHA256)
 {
  "alg": "HS256",
  "typ": "JWT"
}
Payload
A statement or an entity (typically, the user) and additional data.
{
  "sub": "12345678",
  "name": "John max",
  "admin": true
}
signature
To create the signature part you have to take the encoded header, the encoded payload, a secret, the algorithm specified in the header, and sign that.
The signature is used to verify the message wasn't changed along the way
 HMACSHA256(
  base64UrlEncode(header) + "." +
  base64UrlEncode(payload),
  secret)
Working of JSON Web Tokens work?
when the user successfully logs in using their stuff. A JSON web token will be returned. Since tokens are credentials, great care must be taken to prevent security issues.
Whenever the user wants to access a protected route the user agent should send the JWT, typically in the Authorization header using the Bearer schema.
resource for this para & image - > JWT/introduction/
Authorization: Bearer <token>

Let's deep dive into the code section🤓
Prerequisites
Node js (Node.js installation)
Good knowledge of javascript
express server
Nodemon (optional)( for running the server & to avoid reloading of server)
Postman / Thunderclient (for testing purposes)
Aim fo code
A user can register himself and a JWT token will generate then the user login with his there JWT token for authentication otherwise it will get an error🤗
Step 1 - Create a local Server with express
step 2 - require jsonwebtoken dependency
step 3 - create a database (I am using an array as a database)
step 4 - create routes.
app.get('/') = for server testing.
app.post('/register') = Register route
app.post('/login') = Log-in route
app.get('/protected') = to get information of use with the JWT token
Yup, that is!🤠
const express  = require('express');
const bcrypt = require('bcrypt');
const jwt = require('jsonwebtoken');

const app = express();
app.use(express.json());

// create a data base;
let users = [];

// test route ..
app.get('/',(req,resp)=>{
    resp.send("Server is runing");
})

// Register Rounting
app.post('/register',async(req,resp)=>{
    try {
          // getting information of a new user
        const {name,email,password} = req.body;

        // if user is already exits
        if(users.find(user=> user.email === email)){
            resp.status(400).json({message:'User already exitst with same email '})
        }

        // creating password
        const hashPassword = await bcrypt.hash(password,10);

       // create new user
        const user = {
        id: users.length + 1,
        name,
        email,
        password:hashPassword

        }
        // save to database
        users.push(user);
        resp.status(201).json({message:'User registered Succefully'})
    } catch (error) {
       resp.status(500).json({message:'An Error Occured'});

    }
});

// Login route

app.post('/login',async (req,resp)=>{
try{

  const{email,password} =  req.body;

//   find user in database
    const user = users.find(user=>user.email === email);
 if(!user){
    return resp.status(400).json({message:'Invalid User email or password'});
 }

//  compare password with stored password in Database
 const isPasswordValid = await bcrypt.compare(password,user.password);

//   check password is valid or not
if(!isPasswordValid){
    resp.status(400).json({message:'Imvalid email or password'});

}

// Genrate a JWT Token
const token = jwt.sign({id: user.id},'secret_key');
resp.send({token});

}catch(error){
    resp.status(500).json({message:'An Error Occurred'});
}
})

// protected route

app.get('/protected',(req,resp)=>{
    try {
         // taking token from          **Header**
        const token = req.headers["x-access-token"];

        // varify
        jwt.verify(token,'secret_key',(error,decoded)=>{
            if(error){
            return resp.status(401).json({message:'Invalid token'})
            }

            // Get user information
            const user =  users.find(user=>user.id === decoded.id);

            resp.json({user});
        });

    } catch (error) {
     resp.status(500).json({message:'An error ocurred'});
    }
})

app.listen(3000,()=>{
    console.log('Server is runing on port 3000');
});
const hashPassword = await bcrypt.hash(password,10); in this line of code bcrypt library hash a password with 10 salt rounds (means a number of times the password hash is salted. A salt round increases the security of the password hash, making it harder for an attacker to creak.)
Output for the first route('/')

Output for the second route('register')

Output for the third route('login')
in this route, the token will generate and the next route will be to check whether the user is authorized or not.

Output for the fourth route('protected')

if you find something wrong then please correct me. your comment is valuable to me🫡.
Thank you for reading my content. Be sure to follow and comment on what you want me to write about next 🤓
